
I jumped on the bandwagon. My Dad purchased an air-fryer after my cousin was talking about hers on Facebook and now I get the pleasure of testing something that is an actual ‘trend’ and not something that I just suddenly want to try. Air-fryers are the talk of the town, at least around all the social channels I follow and I was fascinated to see if they were actually as good as people were claiming.
Now, I’ve called this a ‘review’ but really it’s not a full review. I won’t be talking about the technical aspect of ‘energy saving’, as a lot of other people go on in depth, because that’s not my area of expertise. I know little to nothing about machinery, energy and how it works (despite what my B in Physics may attest). I can only go with what other people say when they say it saves on energy that your oven uses a lot of. The majority of people I’ve seen speaking about the device are saying that they bought it to combat the cost of energy—so, if this is the side that interests you, look no further than the rest of the internet on explaining that side of things. I’m going to be specifically talking about the quality of food coming from my air-fryer. Air-Fryer food from a trained chef’s perspective.
Another thing I want to make clear before I start is this ‘review’ of Air-Fried food is specific to my Air-Fryer. Other Air-Fryers may cook things slightly differently, have different settings or have more than one drawer. Of course, price range could also change the accuracy of your Air-Fryer. I would say mine is low-mid priced from the Air-Fryers I’ve seen. I don’t, unlike some Air-Fryers I have seen, have to pre-heat my Air-Fryer… I don’t even have that function. I’ve learned through some time using it to set the machine running for a minute on the desired temperature before putting in whatever I’ve cooked… but I’ve also not preheated my machine and cooked from cold. It still, for the most part, has worked but not to the texture I’m after, which is why with practice I learned to preheat for that minute.
And now I’m going to stop rambling on and actually go into the ‘review’ portion of my post (I know, right? Finally). When I first got the Air-Fryer I made the recipe that was included… An Egg McMuffin type deal which claimed you could cook the bacon, toast the bread with cheese and cook the egg at the same time. Well, I wouldn’t claim this was entirely accurate. The bacon at the end was always flabby as it hadn’t cooked for long enough so I ended up frying this in a pan to get it to a nicer texture. The egg, inside a little pot, was cooked but incredibly hard to remove from the dish it was cooked in, even though the pot was well covered in oil. The bread was perfectly toasted and the cheese was well melted. Overall, with the bacon cooked separately, it was very tasty and very quick (you know, if you only wanted to feed one person… For three people it was a bit of a hassle).
We then went on to make a viral Air-Fryer recipe. A large cob of bread, with slits cut into it and large amounts of cheese and garlic butter pushed inside. It was an amazing idea and we enjoyed most of it. We only wished we had more people to share it with as it was so heavy for just two of us. This is around the time that I started to notice both a flaw and a plus to the Air-Fryer. You see, with all the breads that we’d put in, there’d always been a perfectly brown and crispy outside and an almost still soft and bready inside. In an oven I could never reach this texture. The bread would cook most of the way through and become dry before it had become nicely browned. For some breads this would be amazing but the point of difference in the Air-Fryer is that they retained their lightness in the middle.
So it stood to reason that the Air-Fryer, which circulated hot-air fast around the food would cook the outside first and slowly heat through the middle—meaning, theoretically, you would have a crispy skin and a soft-interior. This works perfectly for some foods like chips/fries because… well, that just describes the perfect chip/fry, doesn’t it? Soft and fluffy on the inside and crispy on the outside. But was it any better than a deep-fat fryer? Or an oven, which is it’s closest comparison in actual technology? I wanted to test this out.
But I wasn’t just going to test plain chips in it. Other people have already done chips/fries in the Air-Fryers. I believe them that it works. I wanted to test some of my family favourites and go-to recipes instead.
I kept it fair. My parents played no part in the actual ‘cooking’ of the foods in question, apart from the pudding which my Mum was around for. They both were ‘blindfolded’ (they refused to wear a blindfold and shut their eyes instead) and tasted things without the use of visuals. You’ll see very quickly on the pictures why I didn’t allow them to use their eyes. Purely by taste they told me which was their favourite version of the same foods and exactly why so I could see what was worth doing in the Air-Fryer instead of the usual method (if anything). These are the results of that fun blind taste-testing mission:
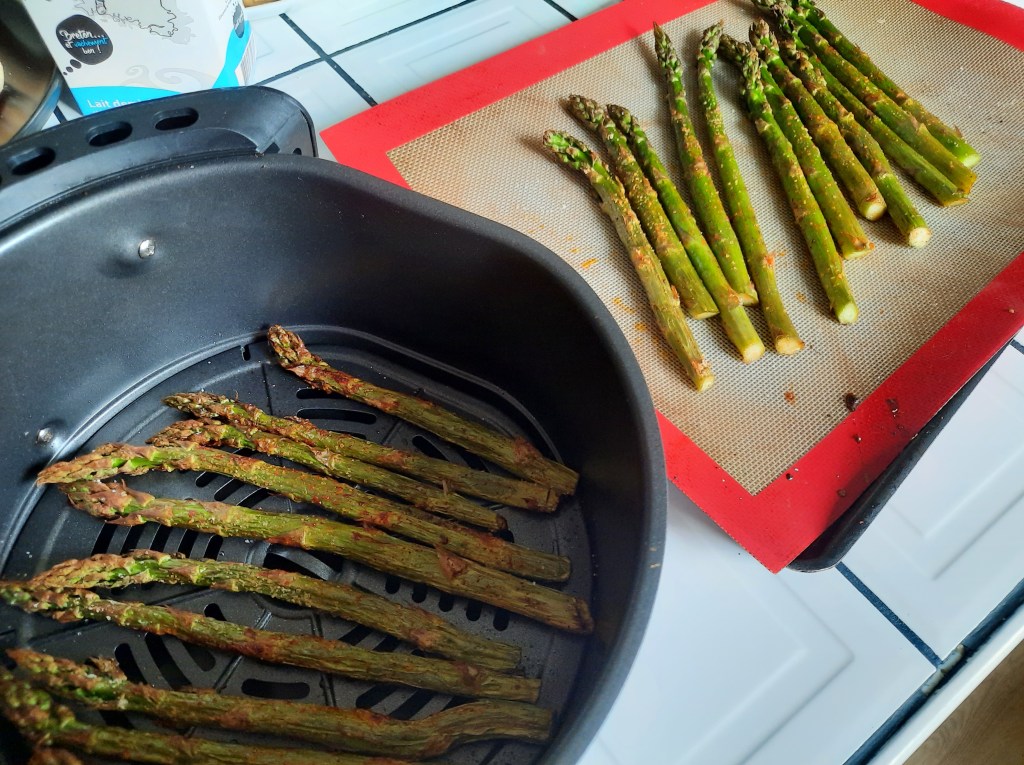
- Asparagus—All the Asparagus was coated in the same oil, in one bowl, with equal amounts of salt and paprika. They were served as they came out of the Air-Fryer and the Oven which I’d timed to be ready at the same time. Texturally, inside, they were exactly the same. They were even both cooked at 200 degrees C. The only difference is the machine they were cooked in. The first thing I noticed on taking the drawer out of the Air-Fryer is that the asparagus cooked in there was a lot more shrivelled and smaller than their Oven counterparts.
However it was easy for everyone at the table to pick a favourite. The Air-Fryer version was so oddly crispy on the outside and soft in the middle that my Dad even believed they’d been breadcrumbed and the Oven ones hadn’t. Don’t get me wrong, the oven Asparagus was amazing too as all roast Asparagus is, but the Air-Fryer brought a level of crispiness that made it addictive to eat. I would definitely recommend to do this (preheat Air-Fryer for one minute on 200. Put 1 layer of dressed Asparagus in and cook for 7-8 minutes on 200 degrees C). Yes, it’s safe to say the Air-Fryer won this challenge (and did exactly as I thought it would based on previous experiments).
- Next up I made my usual quick cheats garlic bread. A piece of Pitta Bread, grate some garlic on top and top with two large pieces of butter. I put it into a 200 degree Oven and into a 200 degree Air-Fryer and they cooked for roughly the same amount of time (the Oven one was in for roughly a minute-and-a-half to two minutes longer).
I will admit this threw me a curve ball as I really expected the Air-Fryer to win this one. However, the issue with it was the butter. In the oven, sat on a flat tray, the butter had pooled on the pitta making a really luscious, buttery bread whereas the butter in the Air-Fryer had seemingly mostly been pushed off the bread into the tray underneath it so it ended up being dryer and the garlic a bit more flavourless (as the Air-Fryer had also really crisped up the garlic causing it to lose flavour).
The textures of both breads were near enough the same on the inside as the oven had only cooked long enough to melt the butter and not dry out the inside. The results of this were more in favour of the oven, or even the grill was preferable, but both my parents struggled to know which one had been cooked which way as they were still exceedingly similar. For this I would say that unless you put the garlic and butter perhaps inside the pocket of the pitta that I would probably still use the oven on taste alone… but the Air-Fryer is still decent enough to make you want to eat more.

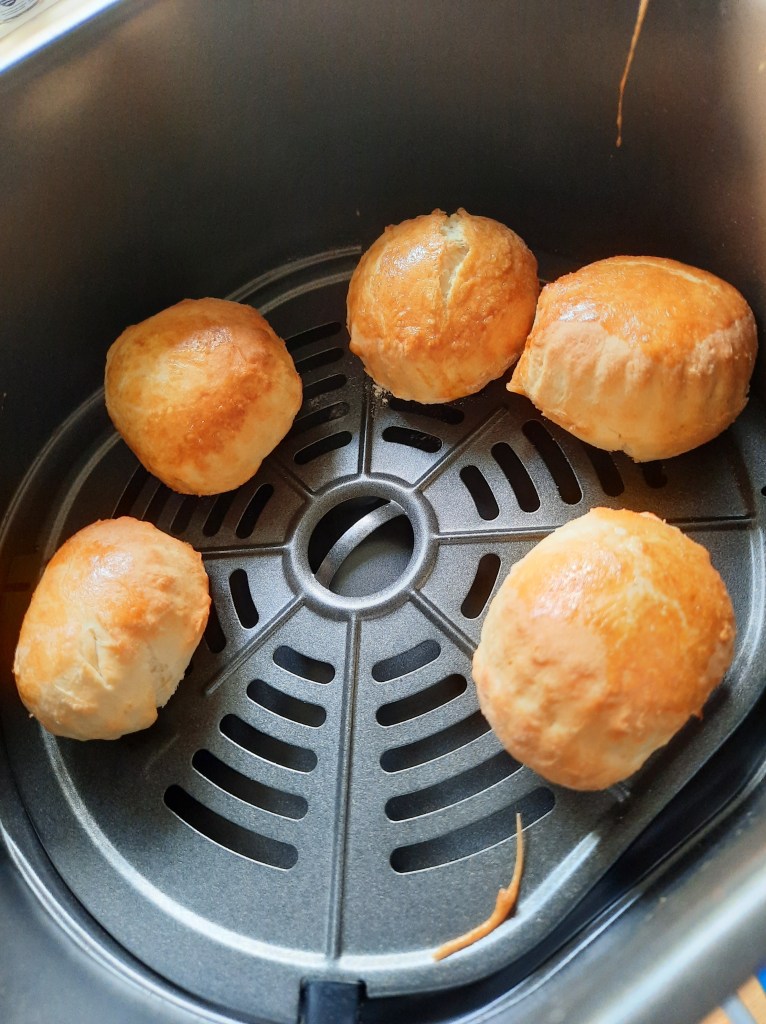
- Really?, you ask me. You, a supposed ‘trained chef’ just put Asparagus and some Pitta Bread in an Air-Fryer and count that as cooking? Well, yes I did, and je ne regrette rien. But, okay, I also did a little bit of cooking too. I did… a recipe I learned before I trained as a chef! In fact, this one was chosen because of some sentimental reasons (and appropriate reasons). The first time I made Arancini (Fried Risotto Balls) was also, weirdly, the first time I used a deep-fat fryer. A deep-fat fryer that I was surprised with that fateful Christmas morning and meant that I didn’t have to burn myself attempting to fry them in a deep pan. I thought it would be appropriate to make them again to test my trusty old Deep-Fat Fryer (not the same one as that Christmas—I saved up myself as a teen for this one) verses the supposed ‘new competition’.
This was one test I really had to make sure my parents both had their eyes closed as it was obvious which one was which. The deep-fat fryer produced its usual golden breaded balls whereas the ones from the Air-Fryer were basically the same colour as the raw versions that went in with a slight spec of darker brown. These were the first no’s I think of the evening. The fried versions were crispy on the outside, soft in the middle. The cheese in the middle was perfectly melted and had a nice cheese pull. Yet the Air-Fried ones were claggy. They were just as hot and yet the cheese was still in cubes in the middle. You didn’t get any of the satisfaction of eating Arancini as you did with the fried version. It tasted ‘healthy’ but not ‘good healthy’. Instead of just tasting ‘healthy’… which, you know, I’d just eat a really good salad… it tasted like disappointment. Overall, it wasn’t ‘bad’ as it still was made with the same risotto but it would have been better eaten as just risotto as the crispy coating that differentiate Arancini just wasn’t there.

- Another family favourite but reinvented slightly for this experiment was Pomme Arlie (I believe they’re also known as Twice-Baked Potatoes in the US?). All the potatoes were first cooked in the microwave to soften them enough to scoop the potato out the skins. Yes, I know that you can cook jacket/baked potatoes in the Air-Fryer—but I don’t do them in the Oven so I’m not going to wait fifty minutes for them to be done in the Air-Fryer either (nor do I trust my Air-Fryer to be so hot for so long either). The microwave is already my hack for jacket/baked potatoes so I stuck with that for the purpose of this experiment (because, you know, realistically, I’m not going to be using the Air-Fryer any other time to do this part).
The potatoes were mixed with leftover cream cheese, soft goats cheese, a beaten egg reserved from egg-washing the pudding and some nicely caramelised balsamic onions, as well as some salt and pepper before spooning back into the skins. They were topped with a few little slices of Comte cheese and then placed under the grill and in the Air-Fryer. They ended up, strangely, taking 2 minutes longer in the Air-Fryer than under the grill.
Again, these didn’t do exactly as I expected. The ones under the grill became nice and crispy on the bottom and the top whereas the Air-Fryer ones (which I expected to do almost the same) never got crispy on the bottom and barely on the top. Oddly as well the inside of the grilled version felt like the flavour had spread more evenly than the ones in the Air-Fryer, even though it’d been the exact same mix inside all of them… and the Air-Fryer ones also seemed to become a bit more rubbery? It was a bizarre difference as I really didn’t expect much difference at all, and if there was some difference I expected it to be the Air-Fryer providing a crispier exterior. But no.
I wouldn’t say I wouldn’t do these in the Air-Fryer again, as after putting it in for another couple minutes it was getting progressively crispier, but it was going to be about equal cooking time in the end. I also think that the Air-Fryer won’t be able to provide that slightly crispy and yet soft exterior that really works for Pomme Arlie (and almost toasty flavour the grill provides either). I think if you were to cook the Pomme Arlie in the Air-Fryer you would have to leave it until the skin was fully crispy on the bottom and eat it more as a crispy skin with potato instead of slightly soft. However, regardless of that, they still all tasted as amazing as you would expect a Goats Cheese and Red Onion Twice-Baked Potato to taste.

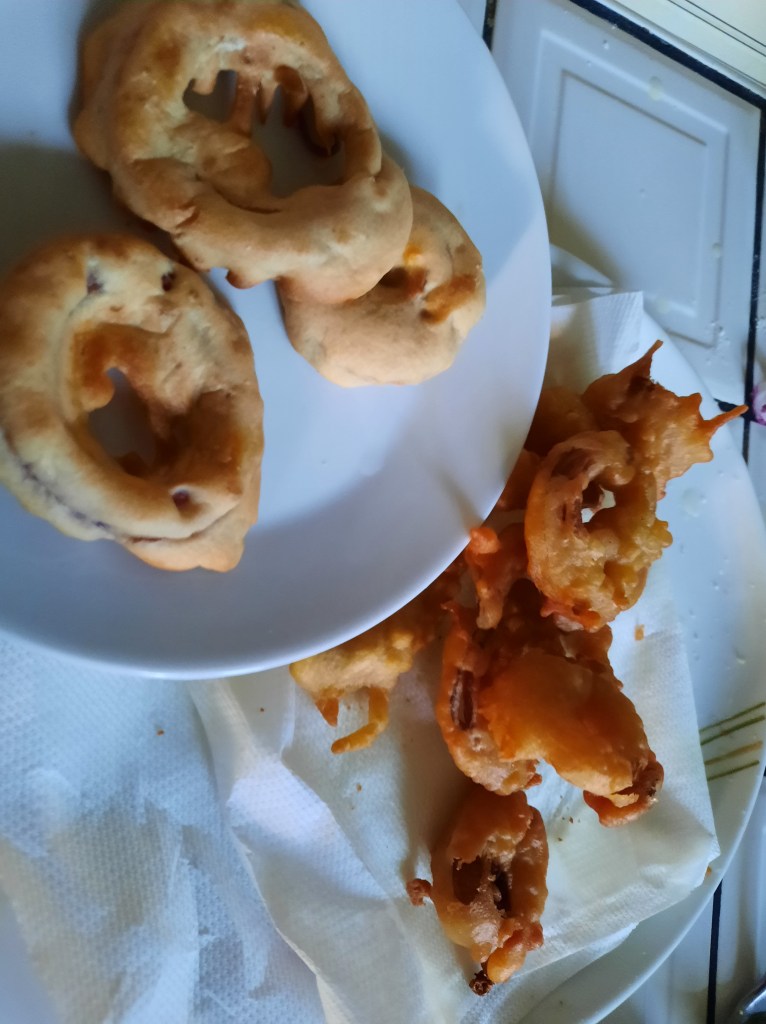
- And now we come to the item that splits crowds. I’ve actually made Onion Rings, as a trial run, in the Air-Fryer before using a batter made with Sprite (yes, the soft drink—I use all sorts of weird things to make batter—all my own weirdness, I’m afraid—and yes, it tastes amazing). I had to do a bit of research to know the right thickness of batter for the machine. My regular light and airy batter wasn’t going to cut it in the Air-Fryer as it would just fall straight off the onion in the time it took to start the machine cooking. So I made a slightly thicker batter using Breton Cider (it was the only fizzy thing we had in and it tastes good as a bonus). By slightly thicker, I mean really thick batter. You could draw with the batter on top of this batter and it would stay for a few seconds (for all you smarties out there, you would call it ‘ribbon stage’). And in order to be fair, and because my parents then proceeded to drink the rest of my Cider, I used the same thick batter in the Air-Fryer version as the Deep-Fat-Fryer version.
Yet again, as with the Arancini, I had to make sure my parents couldn’t see these before tasting them. It was obvious by the pale, pancake-ness of the Air-Fried versions and the crispy-golden exterior of the fried onions which one was which… and, honestly, it was obvious by taste as well because, yeah, the Air-Fried version tastes like a cider pancake with onion inside.
Now, you would expect because of the similarity between the differences of the Arancini that this, like they were, would be an instant ‘no’ again… and for my parents they were. They kept eating the crispy fried ones and enjoying every minute of them. I was the weird standout because, for whatever reason, I quite enjoy them. I don’t think you could realistically call them ‘onion rings’. If I served them to people after promising ‘onion rings’ I would definitely have a riot on my hands and some very unhappy guests. They’re more like ‘onion pancakes’. They’re extremely dry so I wouldn’t recommend eating them by themselves but eating a few of them with some honey (or maple syrup) drizzled on top. I could get behind that. They’re not ‘onion rings’ but they are, at least to me, delicious. Also, as a bonus, they tasted a lot stronger of cider than the fried versions did too so they get an extra tick for flavour. Maybe not for everyone, but for me? Yes.
- Finally we make it to the pudding that I’ve brought up a few times before. We went full on British with it and made scones… Definitely not just because I wanted to try a new recipe (it was). Yes, we made the same recipe, cut them all to the same size and then cooked them in an Oven verses the Air-Fryer. Again, I expected the Air-Fryer to make a really crispy exterior and light and soft middle, as it had done with breads before. Of course, this wasn’t already precooked bread. This was a raw dough and I think there-in lies the difference.
They didn’t rise as much as their oven counterparts. You could see a slight tear where they’d tried to break free but the outside had browned and solidified long before they’d managed to rise. Whereas the oven versions had risen and were lovely and fluffy in the inside. My Dad described the Air-Fryer versions as ‘doughy’… and by that he didn’t mean ‘uncooked’, they were definitely cooked. They were just dense because of their lack of lift. He was very disappointed to learn that there were more Air-Fryer versions to eat so I think you can guess what side he sat on on this course.
This was the first one were timings really made a big difference. Including pre-heating times we calculated that the Air-Fryer scones took around 9 minutes, whereas the Oven version ran to about 30-35 minutes. Obviously, that’s a significant difference when it comes to energy usage and time in people’s lives. For someone like me, who runs mainly on impulses like ‘I fancy this right now’ it could be the difference between me wanting a homemade Scone and not wanting one anymore. For somebody taking a break from work or having a few minutes spare whilst the kids are napping that is the difference between getting a homemade Scone and not. So, whereas I still think the oven scones are better and fluffier, if you fancy a Scone now (!) and can settle for one that isn’t quite as good as it could be, the Air-Fryer will definitely give you the Scone that you can ‘settle’ for.

And that’s what I would say a lot about the Air-Fryer. It gives you ‘food you can settle for’. It doesn’t produce as good as perhaps an Oven would (expect the Asparagus because… wow) and certainly didn’t stand up to my deep-fat fryer on flavour but it produces food quickly that is ‘good enough’ (for the most part). There’s some exceptional food produced, some avoid-at-all-costs and a whole heap of ‘they’re okay. They’ll do at a pinch’. Not too different from other cooking methods. I use my Air-Fryer probably just as much as my regular Deep-Fat-Fryer and I can understand how useful they can be. If you don’t have enough space for an oven an Air-Fryer is small. If you are only cooking for one or two and you don’t want to heat your entire house with your oven, the Air-Fryer is a good replacement. If you just want to quickly heat up some frozen food or make some truly amazing Asparagus, the Air-Fryer is a great and quick help.
I certainly wouldn’t think of replacing my personal oven with the Air-Fryer and I definitely would not use it as a replacement for my Deep-Fat-Fryer, but for me, as an add on device that I use from time-to-time to make some nice, quick food it’s perfect.
I hope you enjoyed this post. If there’s anything you want more information about or if you have any questions (about Air-Fryers, my quick home-made weird batters, Deep-Fat-Fryers etc.) leave me a comment and I’ll respond as soon as possible. I may even turn any suggestions you have into a blog post or provide a recipe for any of the things listed above if you ask nicely (I really need to get better at writing what I make up on the spur of the moment in the kitchen down).

Signed,
The Literary Onion
P.S. Another realisation I had today with my Air-Fryer, since I always have trouble getting the draw in, is it has a right-hand bias. Try to put it in left-handed? Nope, you will have a fight on your hands. Put it in right-handed? Slides right in. Is there a hashtag called #righthandedworld or #lefthandersunite? With this and the pasta machine that hates me, I’m starting to remember bad memories from school again. If you want a blog post on learning to be a chef whilst being left-handed, I have some stories to tell about that too… We have to do things… differently…
